 ADVANCED SCOUT STANDARD
SELF RELIANCE
1.a. Have camped at least 12 nights in a Scout Camp.
In a good Scout Troop, this is no problem. A few weekend camps, one long holiday camp, Rhodes & Founders . . many troops offer 12 nights in camp each year.
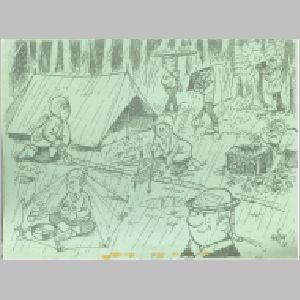
I know of some Troops who keep dreaming of glorious camps hundreds of miles away where sea or mountain or river or forest will provide the ideal setting. But the organization is complicated, transport difficult, time short, money shorter. So, they keep dreaming, and stay home: “Oh, we shall go, if only we can get new tents, a bus., . and Scout Leaders who think of everything.”
Why not shorter camps within hiking distance, where you carry your own gear plan your own programme, discuss it with your Scout Leader, and GO! Get out! With little expense, lots of self reliance, great fun and the greater satisfaction of having achieved something without all the amenities shops can offer. A Scout must be able to make himself comfortable with a minimum of equipment. I once heard a Canadian Scout boast of the frightfully miserable night his Patrol had been through in camp. “We were wet, we were cold, we never slept a wink, and it took us one week to recover from the ordeal” Wel1, this is nothing to boast about. A Scout is proud of being comfortable and of remaining healthy, even under rough conditions. He is never proud of having had a miserable night — or day for that matter — when in camp.
Train yourself to camp like a king with nothing more than you can carry on your back. And don’t wait for the Scout Leader to plan everything for you. The ideas should cone from the Scouts; then the Leader who can help and encourage them.
1.b. Swim 100 yards, any style.
Beware of rivers - But we are not short of swimming pools in this country. No Scout can claim that he is “prepared”, and trained to be helpful if he can’t swim 100 yards with ease.
1.c. Understand the precautions which must be taken before undertaking adventurous activities e.g. sailing, hill walking, climbing, danger of bush and veld fires, water purification, rules to be observed when crossing tribal trust land, etc.
Scouting will offer you a lot of adventurous activities. Some precautions must be taken before undertaking such activities, some rules must be known and followed.
First some precautions to be taken before any adventurous activity:
(i) Numbers; (ii) Information; (iii) Water; (iv) Veld fires; (v) Private property; (vi) Equipment.
(i) Numbers. You must be at least three in your party. Or more. When the activity may involve some serious danger, there must also be an experienced leader. Then, in any accident, at least one can go for help while one remains with the injured Scout.
(ii) Information. Someone, — your parents, your Scouter — must know where you are going, and when you plan to come back. If for any reason you are delayed or change your plans to finish at a different point, put through a message to prevent a search party being sent out.
(iii) Water. You must take it for granted that all water from Lakes and rivers in this country are suspect.
— Strain out the solid impurities;
— Kill the microbes by either boiling it, or by using some water
purifying chemicals like “Halazone” tablets. Follow the instructions on the label.
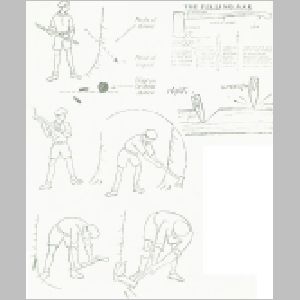
(iv) Veld fires. — Don’t start one. — Be able to control one.
DONT START ONE. I like Rev. John Fall’s clear list of “don’t’ s” on that subject:
“Bush and veld fires destroy grazing, timber and standing crops, and may endanger game, stock, buildings and human lives. Don’t light a fire without an adequate firebreak, don’t leave fires unattended, don't camp in a place where there is long dry grass, don’t leave a fire—place until you know past
all question, that the fire is really and truly out. Don’t throw matches away until you have broken them in half (and better still, don’t throw them away, but poke them into the ground). don’t throw away cigarette ends until they are stubbed out, don’t knock a pipe out until it is cold,
BE ABLE TO CONTROL A BUSH FIRE.
— If it is just starting and is fairly small, you can usually beat it out with leafy branches.
— If there is plenty of water nearby and if containers are immediately at hand, you can stop a small bush fire easily.
To put out a fire:-
Turn smoldering sticks and logs over and drench them on all sides.
Continue using water until only soaking wet ashes remain where you had your fire.
Bury wet ashes in your latrine or cover spot with dirt.
— Those methods may give serious burns to the fire fighters if the fire is too fierce and covers a wide area. In this case, start a back fire: light the bush well away from the coming fire, 100 yards or more according to the size of the fire. Control your own back fire so that it spreads slowly (usually against the wind) towards the main fire. When the two meet, they will both die out for lack of fuel. Be very careful not to start a worse fire yourself. To start and control a back fire is indeed a good exercise in team work and leadership,
— If your party is in danger of being-engulfed by an uncontrollable veld fire, use a similar method: light a fire, and when this has burned a wide enough circle step into this circle. Then keep on fanning your own fire towards the main fire until you have a large area where the fire can’t reach you. You may feel hot, and it does little to control the main fire, but at least you won’t be burnt to death.
(v) PRIVATE PROPERTY.
To camp on a farm, you must obviously have the permission of the owner. Just as obviously, such a permission does not allow you to hike across gardens and cultivated fields, to damage fences, to leave open a gate that you found closed (as a rule, leave a gate the way you found it, unless there is an obvious mistake), to mess up a water point, or to leave behind a dirty canpsite.
Unless you are normally resident in the Tribal Trust area, you are not permitted to hike across, or to camp upon it without permission from the D.C. Where a main road crosses T.T.L., the public has a right to use it. But in such a case, you must stick to the public road. There are good camp sites in the Tribal Trust Lands:
if you plan to use one, obtain the necessary permission and respect the people and their property.
vi) EQUIPMENT.
Always make sure you have all the equipment needed for the activity you plan. And this includes the means of signalling your position should others look for you because they believe you lost your way or because - for some reason you need help. A whistle and matches are a must on any adventurous activity.
Those precautions apply to any adventurous activity your patrol or Troop may undertake. Some specific projects will involve further precautions: we cannot possibly cover here all the possible activities Scouts may organize, but here are some notes on the most popular ones among Rhodesian Troops. Again I quote Rev. John Fall. -
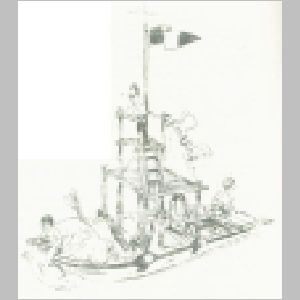
“Sailing. Make sure that the craft is fit in every respect for sea; check that there is adequate buoyancy to keep her afloat; don’t overload the craft; make sure that at least one member of the crew knows how to handle her in dirty weather; don’t attempt anything you know is beyond your powers; ensure that everyone can swim and has suitable flotation equipment and has a life-line (if going to sea in rough waters) ensure that there are charts and someone aboard who can read them; decide who is to be skipper, - and be ready to obey him implicitly in an emergency; know the Rule of the Road, the local boating regulations, the state of the tide (if any), the weather report, local hazards, and what the local inhabitants have to say about sailing conditions; know where the distress signals are kept (if any) and how to use them; know where the fire-fighting equipment is kept (if any) and how to use that; ensure that the lights work, and that there is fuel for them; ensure that there is a pump in working order, or a bailer secured inboard; examine the fog-horn; know the signals to be used at sea.
Hill-Walking. Ensure that your boots and socks and feet are fit for the joy, Have an adequate map and compass, which you know how to use. Have a whistle, a torch, some matches, some warm clothes, rations and a first aid kit, in case you are benighted or injured, or both. (You can blow a whistle longer, than you can shout; a flashing torch can be seen from farther than a shout or whistle can be heard; a fire will keep you warm, and show searchers where you are; warm clothing will lessen the effects of shock or exposure; something to eat will keep the cold out and your spirit up; when you need first aid on the hills, you need it badly.)
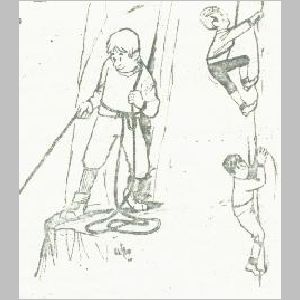
Climbing. Same as Hill-Walking, plus is your rope sound? have you sufficient waist— lines, slings, snap—links, pitons, ice axes (?) and other equipment for the sort of climbs your are going to do? Does your anorak, or hat, show up against the hill? Does everyone know what a belay is, and how to abseil down a face?”
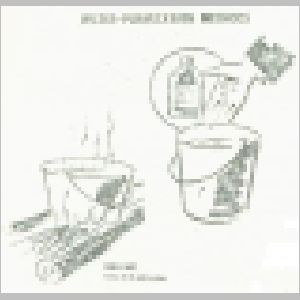
1.d.(i) Be able to operate and maintain a pressure stove.
I speak here of a paraffin pressure stove.
— Fill it up with paraffin. Do not
do this inside the tent, or near a
naked flame, or near someone smoking,
— Place the, stove on a firm surface, e.g. a large flat. stone. Nobody but
the cook should be allowed to move near the stove. If someone else must move, the cook should hold the stove.
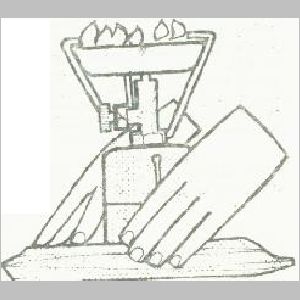
— Prick the nipple to clear dirt.
- Screw the pump home and loosen the needle
valve.
- Put methylated spirit in the cup provided and light it.
— Just before the meths has burned away, close the
valve and pump two or three strokes.
— As soon as it ignites, pump more until it is
going ncely.
- Adjust the flame by pumping more, or by easing
the needle valve for a short while.
— If the flame goes outs quickly release the
pressure, allow to cool for a few minutes, then light again with methylated spirit. Do not try to re—light the paraffin.
— To turn the stove off, just open the needle
valve: the pressure will then escape.
— Do not return a stove to the stores until it has cooled down. Do not store in the tent in case of leaks.
— To maintain your stove, keep it clean, make sure that all connections are tight (needle valve, pump washers, sealing
washer). A little petroleum jelly helps the pump washer if it gets stiff. Replace washers that are no longer air tight.
— Petrol stoves are dangerous to use. “The Scouter”, the magazine of U.K. Scouting printed a firm “safety rule” in June 1969, “Never use a petrol stove or use petrol in connection with any cooking appliance”.
l.d.(i) . . OR Hake a simple lamp using paraffin or fat as fuel.
PARAFFIN LAMP.
Here is a way to make one suggested by Rev. John Fall:
“To make a simple lamp, take a Brasso tin; pierce a hole in the cap; insert a thick piece of rag or string through the cap as a wick; put oil into the tin; replace the cap, so that the long end of the wick is in the oil; light the short end of the string or rag. If you can find a piece of glass tubing to do as a chimney, place it on top round the flame, leaving an airway underneath it. That will do for the paraffin lamp — though you might be able to make a better one.”
FAT LAMP.
This is described by Horace Kephart in his book “Camping and Woodcraft”
as follows: — “A slush—lamp is made by taking a tin can, half filling it with sand or
earth, sticking in it a thin rod of pine or other inflammable wood, wrapping around this a strip of soft cotton cloth, and filling the can with melted fat which contains no salt. Grease can be freed from salt by boiling it in water. Such a light, although it was the best that many of our pioneers had in the olden days, is at best a smoky and stinking affair. The estimation in which it is-held by those who have had to use it may be judged from the fact that in English—speaking countries it has universally been known as a “slut”, except in the Klondike, where they call it a “bitch”.
“If more light is wanted then one wick will afford, use a square vessel
with a wick at each corner. Make snuffers or tweezers, by bending a piece of wire,
with which to trim the wicks when they smoke.”
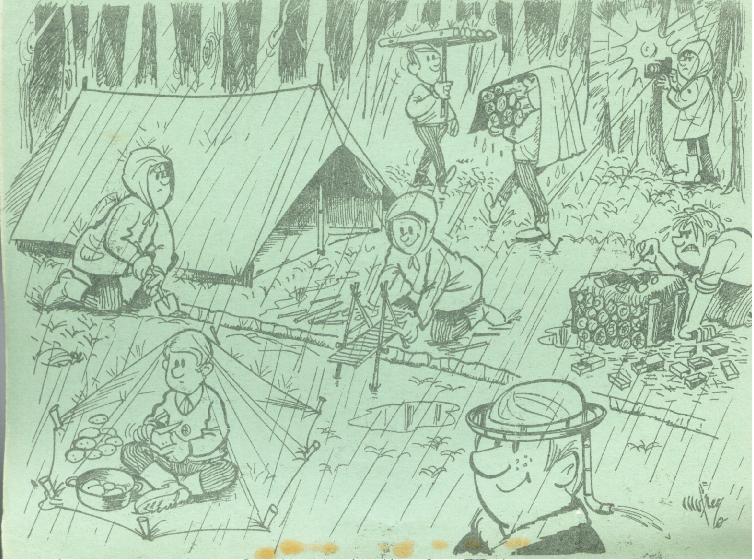
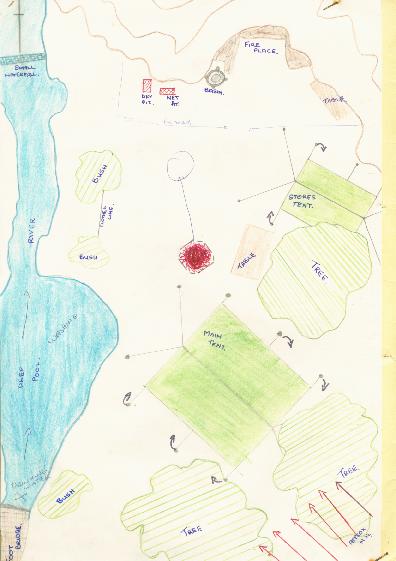
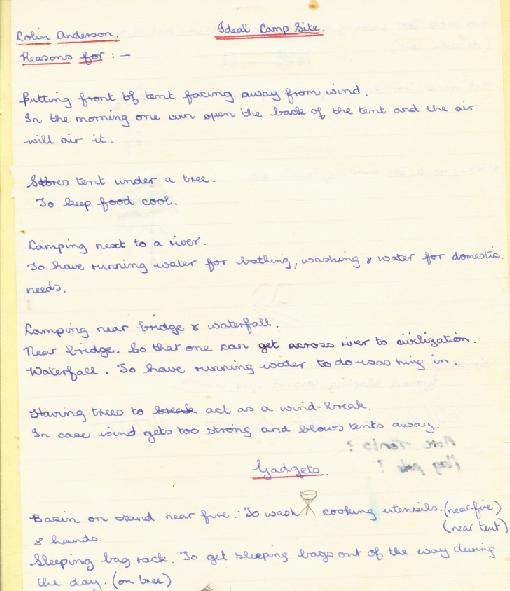
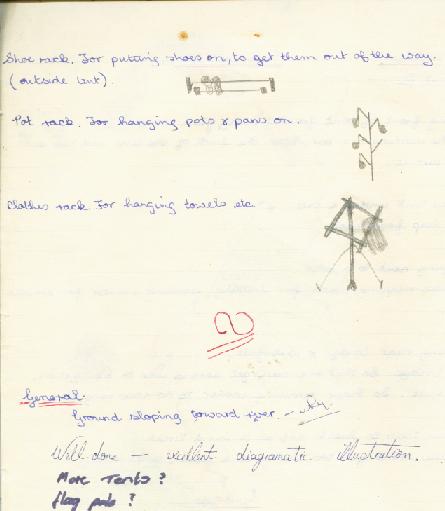
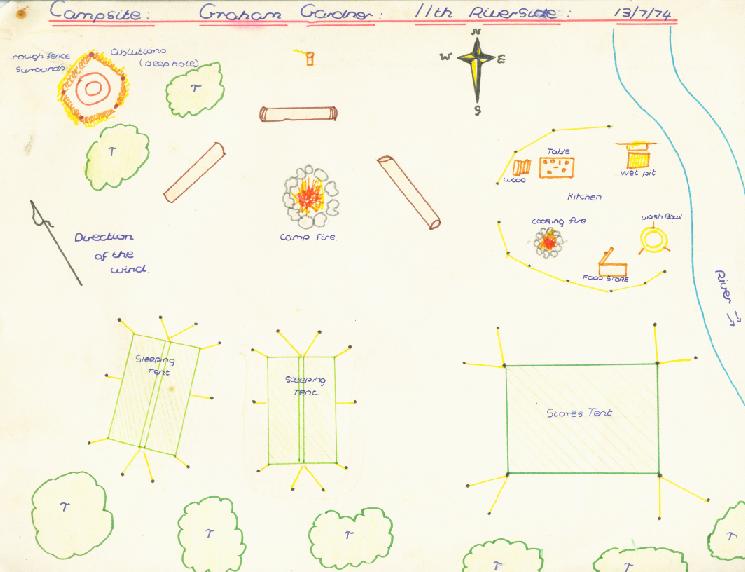
l.d.(ii) Know what to look for when choosing a camp site
The essentials of a good campsite are:
— Water
— Firewood
— Good drainage
Soil (drainage)
— Level ground for tents and plenty of space for games, camp
fire and activities
— Privacy, from people and animals
— Pleasant view
- Grass for bivouac, bedding, gadgets
- Trees for shade and for attaching tents and gadgets
— Protection against prevailing winds
— Reasonable nearness to stores, doctor, church, post office.
The first three are the most important, but never overlook the others. This country is better than most in affording us many campsites that meet all those requirements and more. Of course, some further “essentials” will suggest themselves if your camp has a special aim, like sailing, mountain climbing, exploring rock paintings, etc.
The Patrol Leaders will of course visit the campsite with their S.L. well beforehand, and will try to imagine it under the worst possible conditions, e.g. heavy rain in suamer or bitter cold and high wind in winter. Better still, do that visit during a torrential rain: you will then be able to foresee the worse problems you may have to face.
A few years ago, “The Scout”, a U.K. Magazine, stummarized those essentials under five S’s:
Supplies (to include water, wood, as well as food supplies)
Shelter (from winds, and for shade)
Suitability for your purpose: level ground, space, privacy
Scenery (No brick walls or tar roads at camps)
1.d.(ii) . . . Draw up a complete menus including quantities, for a two-man weekend
camp.
This you will have to work out for yourself, Why don’t you actually go camping with a friend or two on two or three weekends, planning your meals carefully each time, and noting your miscalculations when you are back. Then when you show your Scout Leader a menu for this test, you will know your quantities are right, right at least for your own tastes and appetites.
Here is some advice printed by the late Clande Cook in a catering article (Sable, November 1964)
“You should never have more than one fried meal in every three. More
tummy trouble is caused through eating entirely out of a frying...pan than anything else.
“Include lots of fresh vegetables, particularly green vegetables, salads
and fruit in your diet.
“Don’t just eat steak and sausages. Include fish, eggs, bacon and cheese
in your menu. Avoid tinned foods as far as possible. For one thing they are generally
far too expensive.
“If fresh vegetables are scarce, there are now dozens of good dehydrated
varieties on sale quite cheaply, and with proper cooking they are very palatable.
Unfortunately deepfrozen vegetables are OUT for camping.
“Bread, potatoes, rice and spaghetti or macaroni are all essential for
bulk purposes, as is porridge. But do not rely on bread and jam to cover up every
failure in cooking.”
Mr Cook also gave a few hints on quantities: — “(Unless otherwise stated — per Scout per day),
Bread. Quarter loaf.
“Butter. 1 oz.
“Tea, 4 oz. per patrol of six per weekend.
“Coffee. About the same.
“Sugar. 2 oz. (per Scout per day). More if you are going in for a lot of
puddings and custurds.
“Milk, A most important item from the health point of view. Allow at least half a pint a day per head, and more if you are including
custards or pancakes in your menu. A very good local powdered milk is now available quite cheaply. Make sure you mix it with sterilised water. Condensed milk is for putting into tea only.
“Oats or Mealie Meal. These are very cheap, so do not stint.
“Vegetables. Allow 0.5lb of vegetables per head per day — less if you
have plenty of fruit.
“Cheese, 1 lb. a day does 15 chaps for an after meal snack. But double up
if you are using cheese for cooking.
“Potatoes. 0.5 lb. (2 large ones) is more than enough.
“Meat. Work on an average of 0.25lb. per boy per meal, except for bacon — where 2 oz, is plenty with an egg.
“Sausages. These normally go six to the - pound. Work out the number required,
on the basis of two per Scout.
“Spaghetti. One big packet is enough for 16 normal servings.”
Of course, in this article, Mr. Cook was speaking about any -Scout camp.
It is up to you to adapt those quantities to a “two—man Weekend camp”.
l.d.(iii) Cook a two—course meal for two people in a kitchen or galley and serve it cleanly at a properly laid table.
You will learn that from Mum much better than from a book. Still, to give
you an example, I quote here from “The Scouts’ Cook Book” — “The secret of preparing a meal both successfully and
punctually is doing things in the correct order. It will
pay you to make a list and keep to it. Suppose for example you were having:
- Egg Mayonnaise
Steak and onions with potatoes
Roly—poly pudding,
your list would go something like this:
1. Two and a half hours before meal make pudding; two hours before put it into boiling water.
2. Peel potatoes and onions; cut onions into pieces.
3. Boil eggs hard for ten minutes; shell in cold water, slice up, cover with mayonnaise sauce and keep by in covered dish.
4. Forty minutes before “zero hour” put on water for potatoes (and cut bread and butter if you have it to go with eggs).
5. Thirty minutes before, heat fat in frying pan, and start frying onions.
6. Twenty—five minutes before, add potatoes to boiling water.
7. Twenty minutes before, begin frying steaks (cooking for one minute on either side then for five to ten according to size and whether you like steak “rare”, “medium” or “well done”).
8. Five minutes before, put steak and onions to keep warm; drain potatoes and mash.
9. Zero hour: put on washing—up water; serve first course; followed by second course.
10. Zero hour plus ten (or so): serve pudding.
These times are a little approximate because they’ll depend on the amount
of cooking utensils you have. But this is a sort of guide you should use.”
2.a. Emergencies. Show how to give clear, concise information when calling for the police, fire brigade or ambulance; and know what action to take in the event of an accident or emergency, including rescue from fire, drowning, electric shock.
USE THE TELEPHONE. In most towns in Rhodesia, dial 99 to call the police, the fire
brigade or the ambulance, You can dial this number without Charge from a public phone.
In an emergency, if you don’t know what number to call, just dial “0” to speak to the operator who will put you through.
Scouts living in town should know the procedure for using a public telephone
and practice it so that they can use it without hesitation in an emergency. The instructions are written in every public booth. Study them carefully.
MESSAGE.
Your message must be correct, clear, concise, complete, quick.
Correct. Say definitely what you saw and distinguish from what you heard
from someone else or deduced.
Clear. Avoid Left or Right, except when referring to the banks of stream and rivers, when no other words should be used (face the way the water goes). Use compass directions. Avoid vague numbers: make an estimate. Repeat and spell names preferably using the international codewords for the letters (alpha, bravo....).
Concise. Be economical on words, but not miserly.
Complete. Get in all the facts.
Quick. Short message in time is worth libraries too late.
WHAT DO YOU SAY ?
WHO you are, and who is in trouble: name, sex, age, race,
WHAT happened: how many are hurt or in danger, what has been done so far
for them.
WHEN did it happen?
WHERE Give the exact location of the accident, and say where you are
calling from.
“When ringing the Police, Fire Brigade or Ambulance, the first thing to remember is that they know what they need to know, so if they ask a question, they want a clear answer to their question straight away. Don’ t argue with them, don’t tell them they’re wasting time, and don’t tell them to hurry. Give them credit for being highly—trained professionals, who know their jobs.” (Rev. John Fail)
A C C I D E N T S
We speak here of emergencies, hurry cases.
In any accident, check first on two things which require instant action:
bleeding and breathing.
BLEEDING — Spurting blood must be stopped without delay - by direct pressure (which you learned in your Scout Standard).
BREATHING — If the victim has stopped breathing, or has difficulty in breathing, make sure that the airway is Open, and apply Mouth-to-Mouth or Mouth-to-Nose resuscitation..
BEFORE YOU DASH MADLY TO SOMEONES AID, LET ME GIVE YOU SOME ADVICE: AS A DOCTOR, I HAVE SEEN MANY PEOPLE CRIPPLED FOR LIFE BECAUSE OF “FIRST AID" THAT WAS
GIVEN TOO HASTY AND T00 CRUDELY DONE.
IT’S AS IMPORTANT TO KNOW WHAT NOT T0 DO, AS IT
IS TO KNOW WHAT TO DO.
BLEEDING and arrested BREATHING must be dealt with at once, before any message, before anything else. Keep calm, and be quick.For other injuries, you usually can stop and think, and send for help. More about those when we come to first aid.
IF A PERSONS CLOTHING CATCHES FIRE, THE VICTIMS FIRST IMPULSE IS TO RUN. ITS THE WORST THING TO DO. RUNNING FANNS THE FLAMES. IF YOU ARE EVER FACED WITH SUCH A SITUATION, KEEP YOUR HEAD - RUSH QUICKLY TO THE PERSON AND GET
HIM DOWN ON THE GROUND...
Roll him over and over beathing out the flames. Be careful that your clothes do not catch fire. It is best to wrap a rug, blanket or coat around the victim to smother the flames - if such are handy. Give first aid at once.

(1) House on Fire.
- Keep Doors Closed. Never forget the value of a closed door. An ordinary door will hold back smoke and hot gases, will check the passage of flame, will restrict the movement of air currents, and without air a fire can only burn slowly.
If the door of a room on fire is left open the intensity of the fire will be increased, the staircase and passages will act as a flue, and fire will soon spread all over the building.
If a fire has gained much headway in a house, and escape is for the moment impossible, you would be far safer awaiting help in a room with the protection afforded by a closed door than you would be in passages or stairways.
Before you rush out of a room feel the door; if it is hot or smoke is seeping around it, use another exit. Bar something against the door so it won’t open.
- Movement. It is often possible to move across a floor, or down stairs which may have been weakened by the effects of fire, keeping close to the wall. If you have to crawl down stairs come down feet first.
- Smoke. In almost any fire there will be a certain amount of smoke. Quite a small fire can produce a large amount of smoke in which it would be difficult, or even impossible, to remain unless the correct method was understood,
Air near the floor will be comparatively free from smoke, and
will be cooler, Therefore, in a room full of smoke, always crawl with the mouth as near the floor as possible.
— Opening Doors, If you have to open a door when there may be a fire on the other side and the door opens towards you, place one foot about three inches away from the opening edge, keeping behind the door, The door will be checked after a few inches swing, you will be protected by the door itself, and can shut it again if necessary, The need for this precauticn may be appreciated when it is stated that hot gases in a room on fire can develop a pressure on a door of 5 lbs. to the square foot. If the door is not check it will burst open and flames, smoke and hot air may overcome anyone who is on the other side.
— Rescuing an Insensible Person, It is no easy
matter to lift an insensible person heavier than oneself, and carrying involves the maximum danger in smoke, both from suffocation and falling.
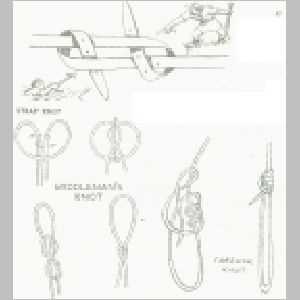
Tie the patient’s hands together with a cord or handkerchief, and place your head through the loop formed. A rope with a bowline at each end can also be used — one loop is placed under the armpits of patient lying on his back, the other goes under the armpits and round the waist of the rescuer.
— To move an Insensible Person Down Stairs. Lay him on his back, head downwards on the stairs, place your hands under his armpits so that his head rests on the crook of your arm, and allow him to slide down.
— Clothing on Fire. Never allow a person whose clothing is on fire to remain standing for a moment, Fatalities nearly always arise from shock or burning about the face and head. If the person starts to run, trip him at once. Roll him on the floor or in a coat or blanket, if you have one handy. If your own clothes catch fire, clap your hand over your mouth and lie down and roll.
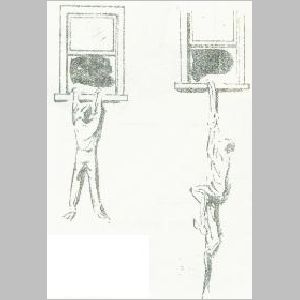
— Escaping Through a window. If you have to escape from a room by a window without the aid of a rope, or even sheets joined together, do not jump. Sit on the window-sill with your legs outside, turn over and slide out till you have a finger—grip on the edge of the window sill and then let go. The drop will be reduced by the length of your reach and body.
— To Lower a Person from a Window Using the Chair Knot. Having put the person in the chair—knot correctly, - i.e. one loop under the arm and the other under the back of the knees, place the rope under the shoe instep and three points of friction will be obtained, which will make the lowering of the heaviest person relatively easy. For practice purposes a dummy or weights may be used.
NOTE — Escape from a window should only be attempted as a
last resort.
(2) Petrol fire: Do NOT use water. Smother with sand or earth.
(3) Electric iron or other electric appliance setting cloth or wood on fire: turn off the switch; smother with earth or sand.
(4) Chimney fire. Place damp sheet or sack in front of the fireplace. Empty the grate. Spray water (or a salt and water solution) up the chimney. NEVER look up.
(5) Fire in car engine. Turn off the engine. Smother with rug or earth.
(6) Grass fire. See Veld fires page 7
As you can see, there is a lot to know about fire fighting and you
should practice it often. When the real thing happens, you won’t have time to go and check what to do in a book.
PRACTICE — PRACTICE — PRACTICE
Your Scout Leader may be able to arrange a talk and demonstration by
your local Fire Brigade.
D R 0 W N I N G
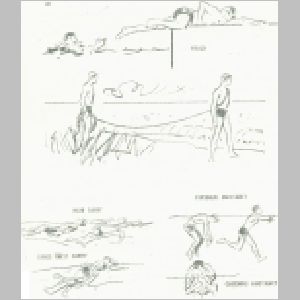
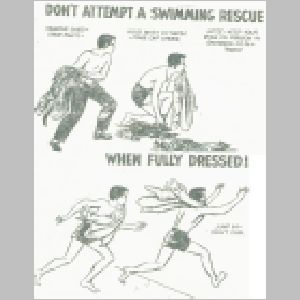
When someone is in difficulty in the water, you have to act quickly.
But you must also care for your own safety. “Jump in and pull him out” is NOT the first rule except in very shallow water.
If he is near enough, reach for him with hand or foot. Reach with a stick, with your shirt, with a rope if you have one, Practice with your Patrol making the longest possible lifeline with your clothes only: shirts, scarves, belts, stockings, etc. tied together (fisherman’s knot or sheet bend) can make a line quite solid enough to pull someone out of the water. But you must be quick!
If you must go in, preferably tie yourself to a tree with a long rope,
or let someone on the shore hold the end of the rope or the lifeline.
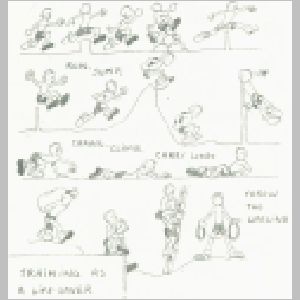
If there is no other way, do go in to the rescue provided you are a very good swimmer. See pages 26, for suggestions on how to train yourself for that.
A drowning person will grasp at anything and his grip is abnormally strong. Approach from the rear if possible, and don’t let him grab you. YOU want to grab him, and you can’t really learn how from a book. So get in the water with a good instructor, The idea is to save a drowning person, not to go and drown with him!
Of course, once a person is rescued, you will apply artificial respiration if needed. In all cases, treat him (and his rescuer?) for shock.
Suppose you are walking along a pool and your leader suddenly shouts, “How long would it take you to pull a boy out of the middle of that pool?” don’t just say an answer: get possible lifeline time, and throw it
“Every time you look at a dam, ask yourself, ‘what would I do if someone were in difficulty in there?” (Rev, John Fall).
This is what being “prepared” means.
   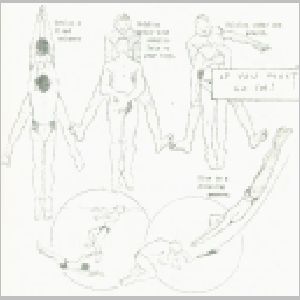  
ELECTRIC SHOCK.
Electricity is a wonderful servant but a dangerous enemy. Treat it with the utmost respect.
Never touch anything electrical with wet hands. Beware of loose plugs. Never let the wires get entangled around chair or table legs or leave them where someone might trip over them.
When you find someone who has had an accident with electricity, turn off
the mains first — this is usually found in a closet under the stairs or in a box in the hall.
Insulate yourself. It is very important that you break contact with the earth. Good insulators are a bit of DRY wood, DRY newspapers, rubber gloves, rubber-soled shoes, then find something to lift the wire clear of the victim’s body such as a dry roll of newspaper, a dry stick, etc. This is important: insulate yourself from the earth AND insulate yourself from the wire you are lifting.
Render artificial respiration if the patient has stopped breathing. In serious cases send for a doctor or an ambulance, Keep the patient warm and comfort him as well as you can.
2. b. First Aid. Know how to deal with snake, scorpion and spider bites; treatment of poisons; alternative methods of artificial respiration when mouth—to—mouth is not possible; demonstrate how to immobilize a fractured limb and understand the importance of this.
SNAKE BITE.
You have passed that for your Scout Standard. You must now re-pass it. This is quite normal. In many good Scout troops, all the tests that concern first aid must be re-passed every year. Whenever you need your first aid, you must really know it well.
SCORPION BITE.
Here I quote from the book “Modern First Aid and Accident Prevention” by Chirurgicus. This is a book all the older Scouts should read and study.
“Scorpion stings are relatively cormnon, seldom serious and hardly ever fatal. The poison glands of the scorpion are small, and this is indeed most fortunate - were it not so, scorpion stings would be very dangerous for scorpion venom is, weight for weight, more potent that that of the snake.
“The sting of a scorpion is extremely painful and if severe is followed rapidly by cramps and even convulsions.
“Treatment of Scorpion Sting.
1. Rest the part, and apply an ice pack if available. This eases the pain.
2. Rest the victim. Lay him down.
3. Give patient one or two aspirins for pain.
4. Inject anti—scorpion serum if available.
5. Send for help.”
SPIDER BITE.
These are as important as snakebites and, in fact, occur much more commonly.
The Button Spider is responsible for practically all poisonous spider bites. Two varieties of Button Spider are found. Their bites are treated by the use of spiderbite serum, which is tremendously effective. It is injected in the same manner as anti-snakebite serum.
Signs and Symptoms of Button Spider Bite. They are (a) a very painful bite wound; (b) very small bite marks; (c) Sweating rather than swelling of the bitten part; (d) Cramps in limbs, chest and abdomen, soon after the bite; (e) a tight feeling in the chest — a feeling of being about to die; (f) Nausea, vomiting, dribbling at the mouth; (g) Unconsciousness and occasional cases of death from heart or respiratory failure.
Treatment of Button Spider Bite. This is the same as for snakebite, and in the identical order of sequence, but substituting anti-spiderbite for anti-snakebite serums (See the seven points in the treatment of snakebite, Scout Standard, page 18)
POISONS.
1. Poisons taken by mouth.
Here are some poisons often taken by mouth: —
— Petrol, paraffin, benzine;
— Tablets and medecines;
— Food: tinned food, mushrooms, alcohol;
— Poisonous plants and berries;
— Corrosive poisons, e.g. caustic Soda (used for making soap, opening blocked drainpipes, cleansing domestic objects);
— Numerous household substances which can be identified by their bottles or containers.
Treatment. Nine things to do quickly, in that order: —
1. Keep the upper airway open.
2. Apply artificial respiration if needed. (Protect your own mouth when dealing with corrosive poisons which have burned or stained the victim’s lips)
3. Identify the poison if possible.
4. Send for help quickly,
5. Try to make the patient Vomit . But NOT if the mouth is burned, and NOT when petrol, paraffin or benzine have been swallowed. Give him an emetic: either two tablespoons of salt to a glass of water, or two tablespoons of baking powder to a glass of water, or one tablespoon of mustard powder to a glass of water.
6. Dilute the remaining poison by giving large quantities of water. Then try to make him vomit again.
7. Give an antidote, provided you know the exact nature of the poison and the antidote required, This is sometimes indicated on the label of the bottle containing the poison. Otherwise, a doctor will decide.
8. Treat for shock. Shock is always present in severe poisoning.
9, Give a soothing drink after vomiting has taken place: milk, or raw eggs beaten up, or flour mixed with water. (But NO milk after carbolic acid poisoning, or after phosphorus poisoning — match heads.)
2. Inhaled poisons-
— Carbon dioxide, or smoke;
— Carbon monoxide, or exhaust fumes from a motorcar engine;
— Chlorine, used in swimming bath filtration plants;
— Petrol, benzine, and carbon totrachloride, which are used as cleaning agents for clothes;
— Domestic gases such as are used in gas stoves and heaters.
Treatment.
1. Take the patient into the fresh air. Cover your mouth and nose with a wet cloth to protect yourself if necessary.
2. Keep the upper airway open, and apply artificial respiration if needed.
3. Treat for shock.
4. Send for help if the patient does not recover quickly.
ARFIFICIAL RESPIRATION.
While doing your Scout Standard, you learned the mouth—to—nose artificial respiration. This is the most efficient and the best method of all, and this is the one you should use whenever you can. Make a dummy on which you end your patrol can practice it.
There are cases when mouth—to—nose artificial respiration is very difficult or impossible:
— When there are poison stains or burns on the face;
— When the victim is vomiting.
What can a first—aider do then?
— First open the upper airway: extend the neck, support the lower jaw, remove foreign bodies which are obstructing the airway.
Unless and until the upper airways are open, breathing is impossible by any means or manner. In most cases, once the upper airway is open, breathing will resume spontaneously. If it does not, it may now be possible to apply mouth—to—nose or mouth— to—mouth resuscitation. It may be an unpleasant task, but using a hankerchief or something similar will make the treatment bearable.
How long should artificial respiration be continued? “Artificial respiration should be continued for as long as the heart continues beating or until the patient resumes spontaneous breathing, or until the doctor arrives and takes over the care of the patient. Only a medical practitioner posses the authority necessary to certify a person dead.” (Chirurgicus)
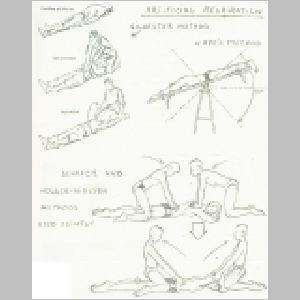
Your test for the Advanced Scout Standard requires that you know “alternative methods of artificial respiration when mouth—to—mouth is not possible”. From what I said above, you will realise that this is extremely rare, if it ever happens. At least, if you use those other methods, use them properly. AND IN ALL CASES, FIRST MAKE SURE THE UPPER AIRWAY IS OPEN. You can’t really learn those methods from a book. See page 31 how to apply those methods. Learn them with an adult first-aider, and practice them frequently.
FRACTURES.
A first—aider cannot always tell the difference between fractures, dislocations and sprains, and it is not
important that they should do so. Whenever you suspect there may be a fracture treat the patient for it.
Signs of a fracture include:
1. Pain, made worse by movement, slightly relieved by rest;
2. Swelling, developing rapidly;
3. Tenderness;
4. Deformity of the limb. But this is not a constant feature.
5. Abnormal movements. Movements are accompanied by pain and a sensation of grating of bone ends. Do NOT rough-handle a limb to test that!
6. Inability to use the affected limb purposefully.
Treatment.
1. Make the victim comfortable.
2. Immobilise the fracture.
3. Prevent further complications: stop bleeding, bandage wounds.
4. Treat for shock;
5. Take the patient to a doctor. (If breathing is difficult — fracture of spine, ribs, neck — make sure
the upper airway is open.)
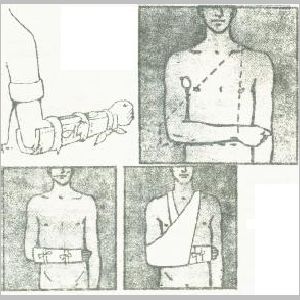
To immobilise a fractured limb, you can tie firmly to the body (e.g. tie a fractured leg to the sound leg), or you can use newspaper, pillows, padded sticks or planks, splints. Use what is available, but IMMOBILISE THAT LIMB!
Various First Aid books, and better still a first-aid instructor, will, tell you how to immobilise fractures. Then practice them frequently.
2.c. Carry out some form of voluntary service. either inside or outside the Movement, either by doing a worthwhile job of at least three hours’ duration, or by performing service for an equivalent period.
Any boy who wants to do some voluntary service, will easily find something to do. Offer to help your priest or minister, your headmaster, a hospital, a library, a mission, the warden of a permanent campsite, etc. etc. Your own Scout Leader can help you find something. He must accept the form of service you have chosen anyway. In some cases, you would be more helpful if three Scouts, or a full patrol, offered their services together.
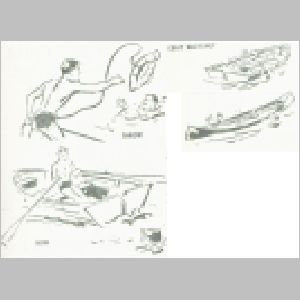
3.a. Complete either a 14 mile journey on foot or by water, or a 50 mile cycle journey on a route set by the Scouter, camping out overnight, with two other Scouts of his own age, and produce a proper log of the journey, including strip map, sketches, photographs and reports on one or two assignments set by the Scouter. The map and the log should be handed in for judging as soon as the journey has been completed. The idea of the test is to see what can be produced en route, and not in comfort at home. Photographs may be handed in up to 2 weeks later.
First, ask your Scout Leader for short practice hikes. Then accompany, as a practice, your friends on their test-hike. You should then be ready for your own.
Here are some hints given a few years ago to the Bata hikers. They apply to your Advanced Standard hike, even if you do it on bicycle.
PACK SENSE.
Reduce your pack weight: you can trim pack weight down by 5 to 10 lb. by thinking carefully about each item . . . but don’t reduce weight by leaving out essentials. Remember that one lb. becomes 10 lb. after the second mile:
1. Avoid tins or bottles. Devise dry rations, and wrap in lightweight aluminium foil.
2. Eliminate cooking utensils entirely, except for one big mug which, when foil—wrapped, serves as a one—man stew and coffee billy. Cook in foil — and eliminate the plate, as you can eat from the foil. Take no fork — your clasp knife and a dessert spoon are adequate.
3. A big towel’s out — take about one sq. ft. of old towel. No cake of soap — just a 0.25 inch sliver.
4. No need for a groundshect and a raincoat! A light plastic raincoat serves as a groundsheod — or vice versa, packed at the top for ready accessibility.
5. Strop bedroll on top of rucksack, protected from rain by wrap of thin sheet of light plastic. A good idea is to roll items like spare togs in the blankets. The plastic sheet, with the aid of your staves, becomes your hike tent, even if only over your head end shoulders.
6. An aluminium or plastic water bottle is lighter than the army type.
7. Plan to share equipment with your pals. One handaxe is enough. One good snakebite outfit is enough. One good but light first aid kit is enough.
HIKE SENSE.
— Keep a good steady pace throughout and make the rests short and frequent— five minutes to every 1/2 hour or so.
— Wear two pairs of socks or stockings, preferably all wool, or wool—cotton mixture. Synthetic socks cause friction and blisters.
— On any road used by cars, hike on the righthand side, facing oncoming traffic, in single file. At night, use a1uminium foil for reflectors — a piece on your rucksack, a piece front and back in your headband, piece looped over each garter, like a long garter tab”.
— C1othing should be loose fitting around waist, shoulders and neck.
- Carry more elasto-type plasters than you think you'll need - heavy downhill work, with pack, brings blisters even to hardened feet sometimes.
- Wear gaiters in grassland and bush for snakebite protection. Most snakebites occur on the lower limbs.
- Don’t eat sweets on the hike — they cause thirst. Impose self discipline with regard
to water - constant sipping from the waterbottle brings on more thirst.
HIKE CAMP SENSE
- As soon as you stop for overnight camp, put on a sweater, especially in winter — otherwise perspiration soon chills you. Best of all, change into dry togs at once.
- For fires, use deadwood from living trees. Build your fire in a safe place, and make sure it is really out, not a spark, before you leave.
- Burn or bury all refuse. When you leave a campsite, nobody should even be able
to detect you’ve been there.!
- Water warning.! Regard all river, dam and well water as bilharzia ridden, or polluted. Carry some Halazone tablets in case you are compelled to purify water en route.
- Camp well away from rivers to avoid the danger of flash floods, and well away from cliffs and inclines with falling—rock risks.
Never hike alone — always with two pals. (This is a rule of this hike anyway.)
— Take your stave. They're useful for selfdefence, making tripods, rigging shelters, improvising a stretcher, leaping a stream, prodding suspected swamp or quicksand, testing water depth, finding North Point, and many other things.
— Remember the law of trespass. Keep off private property or get permission to cross it.
HINTS ON LOG—KEEPING.
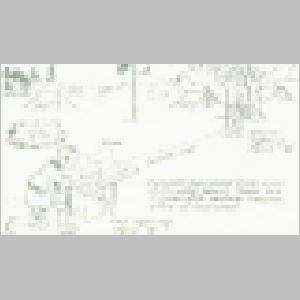
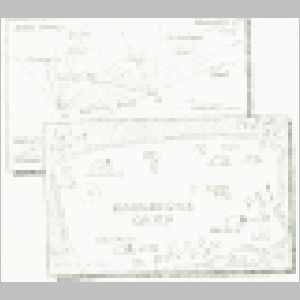
Your report should give a clear account of your route — so that the reader could follow your route without difficulty. At difficult points such as tricky crossroads or forks, it will help to make a simple thumbnail sketch on the blank page opposite, including scale and North Point. Do not be afraid to make simple maps and sketches — this is NOT an art competition. All that is required is that the object should be recognisable. (This sketch and the one page 35 were done by Rhodesian Scouts.)
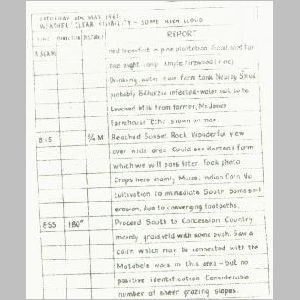 
In your Log give some idea of the type of country you pass through: natural features, kinds of crops, nature of bush or trees, flower (mounted leaves, etc. on blank page will help), bird and animal life (sketches photographs help), open spaces, public footpaths, rivers, depressions, lakes, draw
bridges, railways, etc. Note where good Conservation practices exist, or where they are needed.
Describe features of historical interest: monuments, battlefields, ruins, etc.
Describe human life of area, industrial and agricultural development, types of dwelling, local crafts, items of similar interest.
Report suitable places for Wide Games, Camp Sites . . bearing in in mind factors such as shelter, wood, drinking water, supplies, photographs, sketch maps, and sketches, leaf specimens, etc. will add to your Log’s value.
Finally do equip yourself for log work. Many find it convenient to make a “field desk” of a piece of hardboard, on which you can hold the open Logbook down with rubber bands. You also need a compass, pencil, razor blade, rubber, ruler; a protractor is useful; a map, if one is available. Keep your Logbook in a light plastic bag, against rain, overnight dirt, etc.
Happy hiking!
3.b. Use a prismatic or Silva type compass outdoors to complete a simple exercise involving compass bearings.
(i) Know your compass.
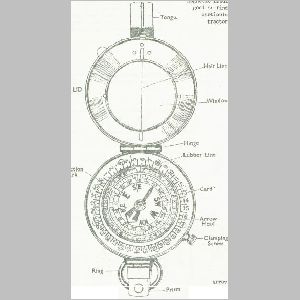 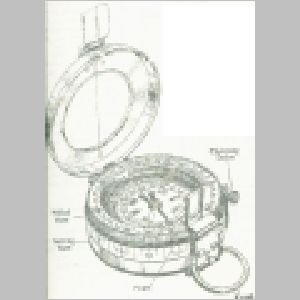
The prismatic compass (at left and
page 36) is the best and most accurate, but most Troops will rather choose to buy the cheaper SILVA compass (page 39). From those diagrams you can learn the names of the various parts of your compass. There are also other good makes of compasses available in this country, such as the RECTA compass, and the Army Marching compass.
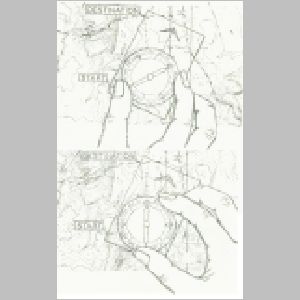
(2) Find the direction of your destination from the map. (See page 40)
(1) Set the base plate of your Silva compass on the map, with the longer edge joining your starting point and your destination.
(ii) Now turn the housing until the orienteering arrow points to magnetic North. The degrees
can now be read at the base of the direction line.
When you use your compass in this way, you take no notice of the magnetic needle. A protractor is just as good to find a direction on the map, particularly if you own a 360' protractor.
(3) Travel on a given bearing.
Turn the housing until the given bearing is at the base of the direction line. Then turn around until the magnetic needle is exactly over the orienteering arrow. Choose a landmark as far as possible which is in line with the direction arrow (see page 39). You can now walk to that landmark even if you don’t follow a straight line course. When you reach it, first take a back bearing (your given bearing plus or minus 180') of your starting point to check whether you are in the right direction. Then pick up a further landmark in the direction you are going. And so on until you have covered the distance required, or reached your destination.
(4) Find the direction of a given landmark. Aim the direction arrow at the landmark. Then turn the housing until the orienteering arrow is immediately under the magnetic needle. Read your bearing at the base of the direction line.
3.c. Explain the contour system, understand how a scale on
a map is arrived at, and be able to locate a specific point on a map by means of
grid references.
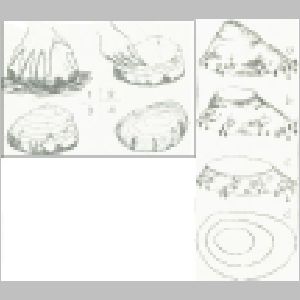
C 0 N T 0 U R S.
(i) Contour map of a stone.
Dip a stone in water about one inch deep, and draw a pencil line along the wet line. Then dip it on inch deeper and draw a second line. And so on until the whole stone is under water. By looking at the stone from above, you can now see a contour map of that stone.
(2) Contour map of a potato.
Cut parallel slices off half a potato at regular 1/4 inch intervals.
Put the parts together and push two needles through your potato and into your paper. Draw around the bottom piece, then lift the potato, remove the bottom layer, replace the remainder and draw again. When you have traced all the layers in this way, you will have a full size contour map of your potato.
(3) Survey naps.
Those two examples show what contour lines represent. Of course, mapmakers can’t dip the earth in water, or slice it off. Making an accurate map requires a lot of knowledge, work and equipment. There exists a good survey map of your area, probably in colour, which your Troop should possess. Then you will be able to recognise the hills and valleys of your area and understand better the contour system. You can picture accurately the relief of an unknown region simply by examining the countour lines of its map. The map extract page 42 is hard to read because it is not in colour. But on a colour map, you can easily distinguish contour lines from rivers and roads.
SCALE.
The scale of a map can be expressed in three ways —
— A statement, e.g. 1.267 inches to 1 mile;
— a ratio. e.g. 1:50 000;
— a linear scale, as drawn below.
A scale of 1:50 000 means that one inch on the map represents 50 000 inches on the ground, or 1 cm. on the map represents 50 000 cm. on the ground, or again whatever unit you choose to work with. Thus from your map, you can know the distance between two points. To obtain the straight—line distance, open your dividers between the two points, or make the two points on a straight edge, and report the distance on the linear scale.
To obtain the distance along a road or river, first lay a string along the road or river between the two points. Them stretch the string along the scale. Other ways of measuring a curved or broken line are:-
— a coin: Mark a starting point on the coin, roll it along the route, then roll it backwards along the linear scale, stopping when you reached your marked starting point.
— dividers; Open them, say 1/4 inch, or 1 cm., and “walk” with them along the route, counting the “steps” you take. This will give you the number of 1/4-inches, or cm. along your route which you can convert to miles, or km. with your stated scale.
— a map measurer or an opisometer if you have them: they work like our coin, but are simpler and more accurate to use.
GRID REFERENCES.
To make references easier maps are divided into numbered grid lines. These numbers, as-well as letters (like TR/UR) follow an international system. When using a survey map, we use only the last two figures of those numbers, and we add to them a third figure which is the first decimal of that number.
 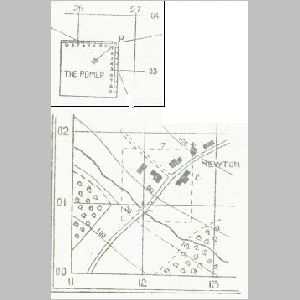
Make yourself a romer by dividing the distance between two grid lines by ten. You can then read that third figure directly from your romer.
In giving the grid reference of a point, give the eastings first, then the northings, in two groups
of three figures each, joined together without decimal points or spaces. For example the grid reference of point P in the figure above is 267035, and the grid reference of Newton Church in the diagram below is 127018.
On the map page 42, what do you see at (i) 974381? (ii)027435? (iii) 015379?
(Answers: (i) A darn lake; (ii) A house; (iii) A triginonetrical beacon.)
3.d. Complete any two of the following:
(i) Take part with your own Patrol or Troop in a joint outdoor activity with a Patrol from another Troop, e.g. camp, hike, wide game or expedition.
(ii) Go alone or with a friend of your own age either to a place of interest, or on a journey of not less than 25 miles, using public transport. Give a brief verbal report on the day’s events.
(iii) Either paddle a single—seat canoe for one mile or crew a dingy round a triangular course, or understand the belay system and abseil properly down 30 feet.
Get your P.L. or S.L. to organise something. Don’t wait for them to think for you: ask them.! You will obviously choose here the alternatives available in your District. I do hope you have the chance of being trained in all of them as they are great fun and useful skills to aquire. This small booklet cannot cover all the alternatives offered. If you have the terrain and the instructor for them, so much the better.
4. a. Complete a pioneering project using at least two different lashings and/or blocks and tackle. (This should normally be a Patrol project, in which all taking the test must play an equal part. Two taking the test and the rest of the Patrol acting as helpers is best).
Your test project will be your first project. What will you choose?
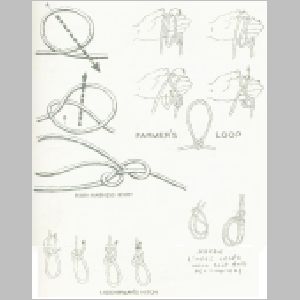
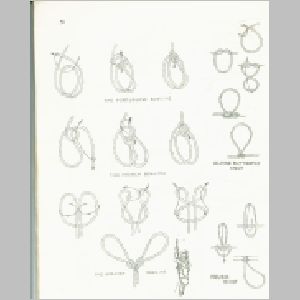
4.b. Demonstrate three knots, bends or hitches useful in rescue (Introduction to nylon ropes
is useful at this stage).
I like this test. Not a list of knots, but a use, a purpose, and you choose your knot. Remember the 3 qualities of a good knot?
Easy to do;
does the job;
easy to undo.
This is particularly important in rescue work where you may have to do your knot in a hurry and under difficult contidions. So choose three for your test and practice them a lot. .They must do the job: “demonstrate”!
4.c. Cook a backwoods meal and eat it. And make a bivouac and sleep in it.
BACKWOODS COOKING.
Here are some extracts from an article signed K.N. published by Sable in 1964 as part of a series, “Cooking and Catering Articles”.
Backwoods cooking is one of the most interesting methods of cooking food at camp, because it offers a much greater challenge than conventional, means.
Adequate preparations are tremendously important. There must be available sufficient firewood to cook the whole meal. Many meals have been ruined, because the fire went out halfway through the cooking process, and the cook had to dash off to find a fresh supply of firewood. The wood must be reasonably hard wood, such as gum, masasa, mnondo, mukwa, etc., to produce a good bed of coals.
Cooking over an open fire requires a lot of attention, and a good supply of coals. It is impossible to grill satisfactorily over a flame, as the flames burn the outside of the food, and leave the inside raw. The fireplace can be either the usual trench fire, or a hunter’s fire, both of which give a good bed of coals, or else a reflector fire, using logs or stones as the refloctor. This typo is rather slower than the trench fire, and also requires the meat to be hung in front of it.
Before putting meat on the coals for broiling, it should be salted and peppered, and quickly passed through a flame, which seals the meat and keeps the juices inside during cooking. Depending on the size and thickness of the meat, it will take about 5 — 7 minutes to cook a piece of steak on the coals, arid a bit longer in front of the coals.
Meat can also be skewered or cooked on a spit over the coals, or in front of the reflector, and this is particularly suitable for rabbits and chickens. Potatoes, onions, and other vegetables can also be cooked on the coals, if they are prepared as mentioncd before.
Spud eggs are made by slicing one third off the end of a large potato, scooping out a hole the size of the egg, and breaking the egg into this hole. Skewer the two pieces of potato and cook on the coals. This will cook in about 20 minutes.
Eggs can also be cooked over coals by skewering with a clean green twig, but the art lies in getting the twig through the egg without the egg collapsing in a mess on your lap.
Eggs can also be fried on a very hot stone, by cutting four pieces of bacon rind placing these in an open square on the stone, and soon after bacon has started to fry, breaking the egg into the square. You will see when the egg is done, but make sure the stone is clean before starting to cook on it, or you will end up with a mouthful of grit as well. The stone is heated by making a fire for about half an hour on top of it, and it can also be used for cooking dampers or biscuits.
Kababs are made by skewering alternate pieces of meat, bacon, tomato, onion, etc. on a thin stick and cooking then over the coals. Keep the pieces apart to allow them to cook evenly.
Cooking a chicken in clay is easy and quick. Clean the inside of the bird but leave the feathers on. Cover the whole thing with about one inch layer of clay, seal it off completely and bury it in the coals, with coals on top. Chicken or rabbit will take 1.5 to l.75 hours to cook, and when the clay is broken open, all the feathers should come away cleanly.
So much for K.N.‘s hints. Now, some ideas from a publication of the Boy Scouts of America:
Here are some tasty dishes to cook without utensils. You need —
— a nonporous rock with a flat surface;
— a two—foot piece of four-inch log, split in two;
— a stick at least 3 feet long as thick as a man’s thumb, sharpened at one end. This is for “rescue work”;
— a pencil—length stick with a 3-inch—deep fork.
Baked Potato. Since it will require at least 40 minutes to bake, completely bury a potato in hot coals before doing any other cooking. Use rescue stick to dig it out of the ashes. Brush off ashes, cut open, season to taste. Use the small forked stick as an eating tool.
Burger-on—the—Rock. Preheat the flat side of the rock next to hot coals. Now slap a hamburger on the rock. Prop the rock at a 45-degree angle next to coals, cooking it reflector-style until done to taste.
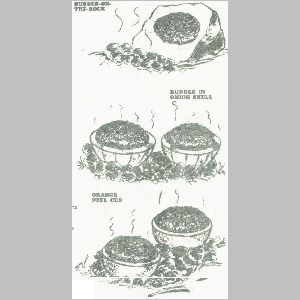
Burger in Onion Shell. Cut a large onion in two along the lines of the onion (NOT in cross—section). Separate the layers, making “cups” two layers thick. Place a burger ball in each cup and set them in hot coals. When cooked on one side roll the burger over inside its shell to finish cooking.
Eat the inner shell of the onion with the burger.
Orange Peel Cup. Cut an orange in half and eat the pulp of both halves. Fill the “cups” with hamburger. Place the cups in the coals, cooking to taste.
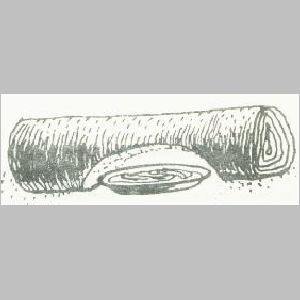
“Another very simple way of baking or grilling", as meotioned in Patrol Book No. 17, ‘Backwoods Cooking’ (U.K.), “is to use a large log which has been partly burned through. Turn it upside down and place the food on the hot ground under the glowing Arch.”
All this should give you plenty of ideas. So go and do it! And eat it!
When you get really interested in backwoods dooking, try a barbecue, an antheap oven, a Maori oven . . . You will find it all fascinating, and very tasty.
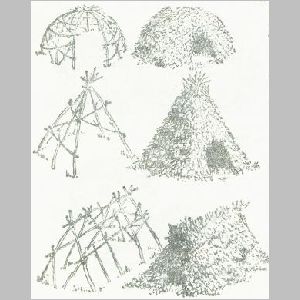
BIVOUAC.
While passing your Scout Standard, you had the choice between making a
bivouac or pitching a hike tent. Now you must make the bivouac, and sleep in it. See the “Scout Standard”booklet, page 49.
4.e. Know the safety rules of axeman-ship, and how to care for a bush saw and felling axe, OR make an African type axe. Use any of these tools for felling, trimming or logging—up light timber (5 inch bore if possible).
Read again “Scout Standard”, page 48.
The following is from “The Scout Handbook” (U.K.):
The Safety Rules of Axemanship:
(i) The Scout who has the axe is responsible for it.
(ii) Mask the axe when not in use.
(iii) Hold on axe properly when walking.
(iv) Never throw an axe.
(v) Wear strong shoes when chopping, take off scarf or anything else which gets in the way.
(vi) Never chop onto or into the ground.
(vii) Always chop downwards and away from your body and aim where the stick you’re chopping is directly
supported by the chopping block.
(viii) Keep your eyes on the place you’re chopping and STOP if you become tired or the axe head becomes loose.
Looking after the axe. Keep the head greased to prevent rust; keep the head masked either in leather or sacking; sharpen your axe before you put it away; Keep the haft oiled with raw linseed oil.
Now some notes on the bush saw. It cuts when you pull, not when you push. So, especially if you are two using it, don’t push, just pull. A saw is much less wasteful than an axe: the kerf is no wider than the blade of the Saw. But it may be necessary to put wedges behind the blade to prevent the blade from being pinched.
Keep your saw dry, lightly oiled or greases when not in use. It is not made to cut through nails or stone. Sharpening a saw is really a proffessional's job. Blades are usually very cheap anyway.
4.e.(i). Either keep a nature diary about birds, animals, butterflies or insects for at least one month,
OR make a specimen collection of leaves and flowers.
NATURE DIARY.
- Get a small exercise book (at least 40 pages). Select one small area that you will study for one month: a kopje, or an open area about the size of a football field, or smaller if there is a lot of life to observe.
On the first day of your month, note the trees, grasses, birds, insects that you can observe in your “plot”. You may have some difficulty in identifying some of them. Then get the “Bundu books’, or preferably an expert to help you. If you can’t find the name at once, at least write a short description, do a sketch of this bird or that tree (leaf, general appearance, etc.) This may well take three or four pages of your book.
Afterwards, you use one page for each day of the month. You write the date on top, a short description of the weather, and then you take note of any change that has occured in your plot: grasses, bushes or flowers you did not notice at first, new animals, birds or insects that visit it, changes in the appearance of leaves, flowers, etc.
As your month progresses, you will soon notice that some animals, birds, insects are familiar to your plot and seem to live in it. Observing their habits is quite fascinating. Note what they eat and when, how they are disturbed by you, or come to accept you. Note any new life that comes to your area, and how long it stays. You can even “make things happen”: bring a small basin of clear water daily and leave it at one place and note from a distance whether anything happens around it; “sow” some bread crumbs or sugar and stay on to observe from a small distance what happens.
All this will require some skill on your part to see and observe without being seen, or at least without disturbing the natural life you want to watch.
Get down to it seriously and you will soon find this project quite thrilling. And your nature diary will make interesting reading later. You will probably want to carry on with your observations well beyond the month asked for in the test.
You will notice that this is exactly what Baden—Powell did in “The Copse” when he was a student at Charter house. This is truly a “Scout” test.
LEAVES & FLOWERS COLLECTION.
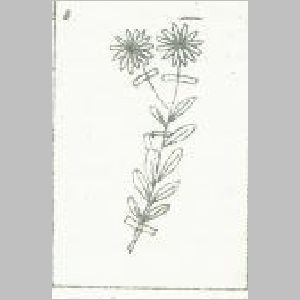
In the field, collect good specimens of different flowers and leaves. Put then in a plastic bag in which you have already poured a little water. Do not press the flowers together, but keep them in different bags. Do not collect too many at one time.
When you return home, take a sheet of blotting paper — or newspaper — and flatten the flower or leaf on it: arrange them so that the shape is recognisable.
Then place more paper on top and press with heavy books or boxes, and leave undisturbed for three days.
To mount, use plain paper and stick the flower or the leaf firmly on to it two or three places with adhesive tape. Write below it the date and place where you found it. Mount each flower and each leaf on a separate page, and keep your collection in a dry place.
In a very short time, you will find that you have from thirty to fifty different leaves and flowers in your collection.
If you find a better specimen than the one you have already pressed, do pick it up to put it in your collection instead of the old one.
Of course you will need a good book, or some expert help to identify some of the specimens you collect. So much the better if you learn a few new names in the process.
4.e.(ii). Either keep a simple daily weather record for one month, or maintain the Patrol Log for two months.
WEATHER RECORD.
Ideally, you should keep a daily record in Summer of: —
Wind direction and speed,
Temperature,
Humidity,
Cloud cover and type,
Pressure,
Rainfall,
Sunshine.
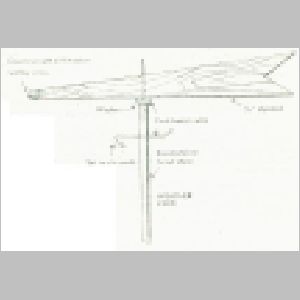
Wind direction. Instrument: a wind vane, or a wind sock. You can make your own wind sock (page 61) or your own wind vane (page 60). Write down the compass point the wind is blowing from. This applies to the prevailing wind for the day.
Wind force. Instrument: anemometer (rotating cups connected to a speedometer). Expressed in terms of the Beaufort scale (page 61). Here you don’t really need the instrument, as you can estimate the wind force from the descriptions given with the Beaufort scale. You can improvise a wind speed indicator (page 62) which can replace the anemometer.
Temperature. Instrument: ideally a maximum and minimum thermometer. Read at 8 every morning, it gives you the lowest temperature reached during the night, and the highest reached the previous afternoon. You can also use an ordinary thermometer and read your low as you get up in the morning, and your high round 2 p.m.
< br>
   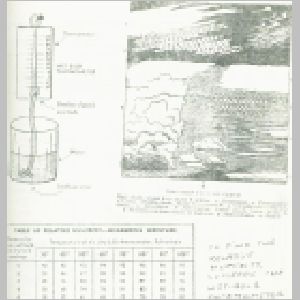
Humidity. Instrument: hygrometer or dry- and wet-bulb thermometer. They tell you the % of water vapour in the air. You can make your own wet—bulb thermometer (page 63) which you can then compare with an ordinary (dry—bulb) thermometer and get your percentage from the tables Page 63.
Clouds cover: indicated by a number from 0 to 8, 0 meaning a perfectly clear day, 3 for example meaning that three eights of the sky was covered, 8 meaning overcast.
Type of clouds. See diagram page 63. There are ten main types. Write down the ones observed longest (if any) during the day. Note also the special conditions that may prevail on some days: dew, mist, fog, drizzle, rain, hail, thunder & lightning, frost, etc..
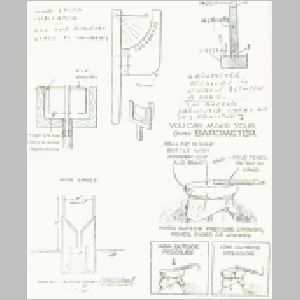
Pressure. Instrument: barometer. Either a mercury barometer (page 62) found in some laboratories only, or an aneroid barometer, some of which can be bought fairly cheap. The “bottle” barometer described page 62 is very inaccurate, and can only give you an idea of “high” or “low” pressure. If you have a good aneroid barometer, record its readings in cm. or in. of mercury.
Rainfall. Instrument: rain gauge. You can make your own. (page 62). Record at 8 a.m. daily, in inches or in cm. I hope you don’t do your weather records during the dry seasons.
Sunshine. Record how many hours of sunshine there were during the day.
This project becomes very much simpler if you have the use of a good weather station with all those instruments. Many of them are usually kept in a Stevenson Screen. Some schools and some farms have a number of good meteorological instruments.
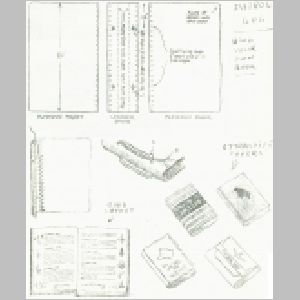
PATROL LOG.
Make this a really attractive book that you will like to examine again later.
Get a hard cover book, or preferably loose sheets which you can bind Yourself :
when it is complete (see page 64).
Include Patrol name and sign, with the Scout badge (cover), names,: addresses, telephone numbers, birthdays, (thumbprints?) of every member of the patrol, a progress chart kept up to date, sketches, photographs, pressed flowers and leaves (with relevant caption), a short history of the patrol. Then a diary of your share in Troop meetings, your Patrol meetings, Patrol camps, Patrol—in—Council meetings. Record all the small incidents: your successes and failures, any humorous happenings
all this contributes to a pleasant log, worth keeping, interesting to read again in later years.
4.e.(iii) Either visit an important building or other local feature and compile a short report about it, describing its history and purpose, or survey a small area in the vicinity of your home, such as half a mile ‘of river, area being laid out as a township or a dangerous traffic intersection, and construct a large—scale plan showing its important features.
VISIT
“How about inaginirig that you are writing it up for a guide—book? Jam in as much local colour as possible, so that anyone reading your report would want to see the place, and when they got there, would have something to look at, and think about. Not everyone’s cup of tea, perhaps, but a thing which everyone could have a shot at.” (Rev. John Fall)
SURVEY.
For a large-scale plan, a plane—table survey might be useful. See page 65, and below.
4.e.(iv) Show attainment of a skill or interest by passing a Pursuit badge.
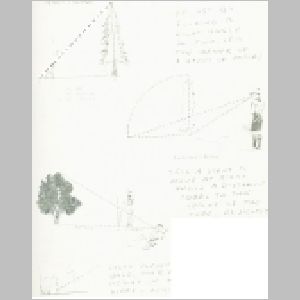
4.e.(v) Using improvised apparatus, such as Scout staff, estimate three distances not more than half a mile, and three heights not more than 100 ft. In each case the estimate to be within 10% error above or below the actual.
First you should find out and remember what are your personal measurements:
1. Your height.
2. Your reach (how high can you touch with your finger tip?).
3. Arms extended, finger- tip to finger-tip.
4. Between thumb and forefinger extended.
5. Between thumb and little. finger extended.
6. From elbow to finger-tip.
7. Your pace. Walk naturally 20 paces. Measure and Divide.
Also, can you find on your body something that measures exactly:
8. one inch?
9. one foot?
10. Three feet? (continued page 69)
Once you know those measurements, you can use the methods illustrated pages 67 and 68 to pass your test.
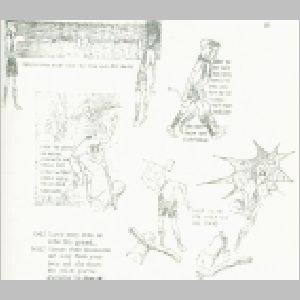
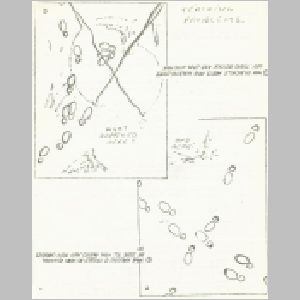
4.e.(vi) Read the meaning of a series of simple tracks made in sandy or other suitable ground. These should include running, limping, carrying a weight, walking backwards and blind gait.
I am printing two tracking problems page 70. But tracks printed on paper and tracks made on sand are two very different things. The only way to learn tracking is to follow Rev. John Fall’s advice: — “Read Camp Fire Yarn No. 12 in ‘Scouting for Boys’. Then get a pal. Find a suitable bit of sandy ground. Watch him wa1k over it, run, limp and hop over it, and then examine his tracks. Do the same for him. When you think you can recognise the different gaits, smooth the sand out, and turn your back. Let him cross the sand using whichever gait he chooses. Try and decide, from an examination of his spoor what he was doing. Keep on doing it, until you are right first time, every time. Practice is the only secret.”
4.e.(vii) Send and receive a message of at least 30 words either by flag (semaphore or morse) over a distance of 400 yards, or by key to a person out of sight and sound, at a reasonable rate and using correct procedure.
If you have done signalling for your Scout Standard, then this is only a matter of more practice. See Scout Standard, pages:35, 38, 39, 40.
4.f. Discuss with your Scout Leader: —
(i) Your understanding of the Scout Law and Promise.
(ii.) Your future Scout Training.
In a previous booklet, “Be Prepared”, I told the new Scouts how they could come to understand the Law, and Promise. Among other ways, I suggested: —
“Best of all, look at the older Scouts in the Troop. They have been improving their understanding and practice of the Law for many months and will provide you, by the way they live, with the best explanation of all.”
Rather a challenge, isn’t it? I felt I could dare write that because a Scout who is about to finish his Advanced Standard must be a better Scout than when he started. All the wonderful tests you passed for this badge are important, but don’t loose sight of the fact that they are merely means or making yourself more usefu1, more reliable. Think of that when you plan your future Scout Training. You will indeed carry on working towards more badges. But you must also be of service: help the younger Scouts, help the Cubs maybe, help your Troop and your Scout District in whatever project is organised.
You will wear a new badge: it does not show that you have completed your Scout Training - it merely gives you permission to move on to wider Scouting. So far you travelled along a path.. You now move on to a smooth and rewarding highway of achievement, service, responsibility and leadership.
Brother John Wilcott January 1971
|

